Showing posts with label milestag. Show all posts

Tuesday, 21 July 2015

Pyro Box


Visit Tagbits to see the full range of tagger products described in this blog.

Some weeks ago I completed the 'Pyro Box' for Steve at Operation Lasertag.


It's more like a 'defend the hill' than the normal DomTube 'king of the hill' style game.
The box is assigned to one team, whilst the opposing team needs to attack the box. A digital display shows the box 'health' and a clear, 3D printed light bar is used to indicate hits.

Each opposing team hit reduces the box health by the shot power, and when it reaches zero an explosion sound is played. In addition, there is a wired output to drive a squib so a pyro can be activated. This is connected via the push terminals at the front. Internally, a radio transmitter sends a signal to a remote receiver that can also drive a pyro, allowing a safe distance between players and effects where required.

In addition, the box can be configured so that the defending team can 'repair' the box by shooting it, which adds their shot power (or half their shot power as a switched option) back to the box health.

The control panel is formed from laser cut 6mm acrylic and is mounted in an IP65 box with a carry handle.

Don't have a video of the complete unit, but here is a proof of concept run on the bench:

Saturday, 22 March 2014

Chinese Conundrum

I've been buying IS1790 playback chips from AliExpress. These are about 1/3rd the price of the 'official' chips from DigiKey. Lately though I have been experiencing failures of around 50% of the chips that have been delivered.

The supplied chips are obviously copies, and when they work they work 100% of the original. However, the only way to check if they function or not is to solder a 28 pin SOIC down and hope for the best. A bit inconvenient if it proves faulty.

So to allow me to check the chips before sticking them down I came up with this:


It's a Tagbits UMT board wired into a 28 pin SOIC ZIF (Zero Insertion Force) socket. This lets me plug in a chip and test it without requiring me to solder it to a PCB.

Sunday, 23 February 2014

Milestag sniper rifle


Visit Tagbits to see the full range of tagger products described in this blog.

Finally got around to trying out my Milestag sniper rifle at Steve's (Operation Lasertag) site in Wakefield. Fantastic day out with son Joshua as usual. Rifle performed well in situations where enemy was attacking from a distance. Useless close up though! All 3D printed as usual.


Thursday, 16 January 2014

Milestag UMT audio


Visit Tagbits to see the full range of tagger products described in this blog.

I'm being asked to do several Milestag projects that use my Tagbits UMT boards, but they need audio resources that are not supported by the standard UMT audio tool.

Jim at Lasertagparts kindly supplies his sample programming utility and audio samples without licence.


However, it only supports 15 sounds, and none are allowed to be longer than the standard samples that Jim provides.

I did a project that shoehorned alternative samples into the lengths available here. But it was a pain.

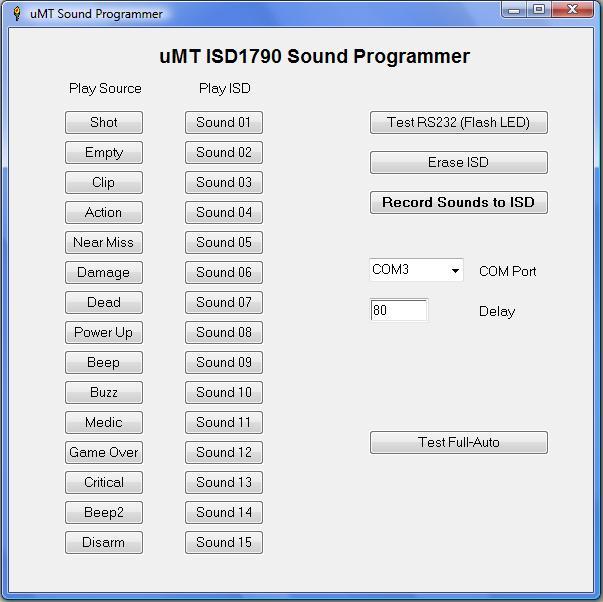
So I finally got around to writing a utility that allows me to point the PC at a directory with some .WAV files in it.

It reads them all in and works out the lengths, then allocates these to 'sectors' within the ISD1790 playback chip.

This device has analogue memory, with each sector having a timespan of 0.125 seconds.

My program loads the samples up, allocates them sectors, programs them into the the UMT board ISD1790 (combined with custom PIC software to do this), plays the sample from the PC, plays the sample from the UMT board and finally generates a 'C' structure with all the correct addresses in.

Here is a screenshot of the program:


And here is the 'C' output it produces:

 
typedef enum
{
 e01_shot_umt,
 e02_empty_umt,
 e03_clip_umt,
 e04_action_umt,
 e05_miss_umt,
 e06_hit_umt,
 e07_kill_umt,
 e08_power_umt,
 e09_beep_umt,
 e10_buzz_umt,
 e11_medic_umt,
 e12_gameover_umt,
 e13_critical_umt,
 e14_beep2_umt,
 e15_disarm_umt,
} ESoundId;

#define LOWBYTE(value) (value & 0xff)
#define HIGHBYTE(value) (value / 0x100)

typedef struct
{
byte byStartLowByte;
byte byStartHighByte;
byte byEndLowByte;
byte byEndHighByte;
}SSound;

SSound sounds[] =
{
 {LOWBYTE(0x0010),HIGHBYTE(0x0010),LOWBYTE(0x0018),HIGHBYTE(0x0018),},
 {LOWBYTE(0x0019),HIGHBYTE(0x0019),LOWBYTE(0x001A),HIGHBYTE(0x001A),},
 {LOWBYTE(0x001B),HIGHBYTE(0x001B),LOWBYTE(0x001D),HIGHBYTE(0x001D),},
 {LOWBYTE(0x001E),HIGHBYTE(0x001E),LOWBYTE(0x0023),HIGHBYTE(0x0023),},
 {LOWBYTE(0x0024),HIGHBYTE(0x0024),LOWBYTE(0x002A),HIGHBYTE(0x002A),},
 {LOWBYTE(0x002B),HIGHBYTE(0x002B),LOWBYTE(0x002F),HIGHBYTE(0x002F),},
 {LOWBYTE(0x0030),HIGHBYTE(0x0030),LOWBYTE(0x003D),HIGHBYTE(0x003D),},
 {LOWBYTE(0x003E),HIGHBYTE(0x003E),LOWBYTE(0x0048),HIGHBYTE(0x0048),},
 {LOWBYTE(0x0049),HIGHBYTE(0x0049),LOWBYTE(0x004C),HIGHBYTE(0x004C),},
 {LOWBYTE(0x004D),HIGHBYTE(0x004D),LOWBYTE(0x004F),HIGHBYTE(0x004F),},
 {LOWBYTE(0x0050),HIGHBYTE(0x0050),LOWBYTE(0x0056),HIGHBYTE(0x0056),},
 {LOWBYTE(0x0057),HIGHBYTE(0x0057),LOWBYTE(0x005F),HIGHBYTE(0x005F),},
 {LOWBYTE(0x0060),HIGHBYTE(0x0060),LOWBYTE(0x0063),HIGHBYTE(0x0063),},
 {LOWBYTE(0x0064),HIGHBYTE(0x0064),LOWBYTE(0x0067),HIGHBYTE(0x0067),},
 {LOWBYTE(0x0068),HIGHBYTE(0x0068),LOWBYTE(0x006D),HIGHBYTE(0x006D),},
};


It will not work with Jim's standard Milestag UMT software, and I initially thought it could be patched into the existing Milestag code by putting in the new ISD addresses, however, a quick look at a disassembly of Jim's code shows that this will not be possible. However, it could easily be used with my open source UMT code on Github.

Thursday, 24 October 2013

Filastruder print results

I printed one of my Lasertag focus tubes with the Filastruder produced filament that I made yesterday. This is a tube designed to hold an infra red LED at the focal point of a lens, and allow the LED to be moved along the focal plane to allow it to be properly focussed. I was really pleased with the results:


The natural ABS supplied with the Filastruder kit has a slightly off white colouring as expected. But the final result is comparable the output from commercially produced filament.

The top surfaces of the flat objects were nicely filled and even:


And no blobs on the Z axis:


The issue I had was with the end of a 45 degree chamfer on the Z axis. It appears that the filament was forced along too tight a radius. I have increased the extrusion temperature, this was done at 230C, and I'm trying again. Fantastic results for first attempt!

Sunday, 6 October 2013

Dome on the range part two.


Visit Tagbits to see the full range of tagger products described in this blog.

I make sensor domes for my Milestag guns using 2mm acrylic sheet heated in the oven and press formed over a mold using a 3d printed ring which is designed to fit over the mold. You can see the mold and the forming ring here:


The ring fits into an MDF sheet that allows me to push down enough force to deform the acrylic over the mold:


I wanted to experiment with polycarbonate sheet. It is cheaper and tougher than acrylic. However, it has a higher glass transition temperature (147C) than acrylic (107C) and this caused the ABS plastic of the forming ring to soften and leave deposits on the egde of the dome during the deformation process.

I decided to make a replacement forming ring from aluminium. I bought a billet from ebay for about £6.


I used a combination of drills and boring bars on the lathe to turn a replacement ring. It came out rather well:


It fits nicely into the MDF sheet and works slightly better than the ABS ring when forming the sheet as it has a narrower rim which allows me to apply more pressure to the sheet.

Wednesday, 11 September 2013

Safety Last


Visit Tagbits to see the full range of tagger products described in this blog.

My Milestag sniper rifle is coming along nicely. It has to be ready for the 22nd September when my son plans to use it at his lasertag party. The plan is to have two teams of 8 against a lone sniper.

I've added a couple of features to the rifle:

I've added a Barrett style muzzle brake:


And a mount for the RJ9 connector for the head sensors:


I've plumbed in the LS2020 laser module and this is working. This is going to be used at a commercial lasertag site, which uses Adventure Sports equipment. I have created a special version of my open source UMT code to be compatible with the AS protocol.

I've decided to play it safe with the LS2020 laser. Even though it is a class 1 device, I have modified the software to enable the PIC watchdog timer. The worst case Milestag packet length is around 27ms (all 1s). My software kicks the watchdog only in the 'turn the laser off' code which is called continuously unless a Milestag packet is being transmitted. The watchdog timeout is set to around 30ms and so if anything goes wrong and the laser is left on, the watchdog will reset the PIC and turn it off. So the laser will only ever be on for a maximum of 30ms.

The final step is to align the laser with the telescopic sight. To achieve this I've printed an adapter to allow me to attach a bullet camera to the telescopic sight:


And I've created a special version of the software that sends a Milestag packet every 500ms so I do not have to stand there pressing the trigger and reload buttons as I line up the sights.

Sunday, 1 September 2013

Milestag sniper rifle wiring


Visit Tagbits to see the full range of tagger products described in this blog.

Now I am satisfied with with the LS2020 adjuster I've turned my attention to to the wiring. Using the worlds longest 10mm drill bit:


I drilled a hole along the axis of the stock:


Using some 3mm ABS filament as a pull through, I installed cables for the trigger, muzzle flash and IR laser:


Using picatinny rail mounts modified with holes in the appropriate places:


Finally I fitted the box to contain the electronics. This is mounted with a 3D printed rail mount:


Just need to add the electronics hardware.....

Monday, 26 August 2013

Laser diode adjuster: Third time lucky


Visit Tagbits to see the full range of tagger products described in this blog.

After 3D printing my Mk2 LS2020 laser diode adjuster I decided that it could be improved. I managed to reduce the height by about 20mm and improve rigidity. Here is the new design:


Here it is fitted to the sniper rifle body, note that the wooden stock is now stained:


From the top it is noticeably slimmer than the previous version:

Sunday, 25 August 2013

Laser Adjuster Fitted


Visit Tagbits to see the full range of tagger products described in this blog.


I fitted the LS2020 laser adjuster to my Milestag sniper rifle after printing and fitting a picatinny mounting clamp. It looks good, but it sticks out too far. I've had a few ideas for a Mk3.


Second Sight


Visit Tagbits to see the full range of tagger products described in this blog.

After designing a windage/elevation moubnt for the LS2020 laser diode, I realised that there would be too great a moment if the laser was twisted. So I redesigned the entire thing and came up with this:


It has an arm which rotates around an M4 screw. This is held in position by a long M4 bolt which engages in a 'V' indentation in the outer circumference of the arm. This screw acts as a worm drive and allows accurate positioning for the elevation.
The windage adjustment mounts on the arm, and uses a pair of hinged plates. These are moved together/apart by an M3 screw threaded into a brass bar embedded in the lower plate. This has some rotation as the angle of the M3 screw changes as adjustments are made.

Here it is in the real world, the LS2020 module is just visible.


The elevation adjustment screw can be seen in the centre of the plate with six screws:

Tuesday, 20 August 2013

Mounting a LS2020 laser module


Visit Tagbits to see the full range of tagger products described in this blog.

As part of my Milestag LS2020 sniper rifle project I have designed a mount for the LS2020 laser module which allows adjustment for elevation and windage. Of course, when firing just photons the Earth's gravity and the wind speed are irrelevant. This adjustment will however allow me to align the output of the laser module with the gun sights:

Tuesday, 13 August 2013

Trigger Happy


Visit Tagbits to see the full range of tagger products described in this blog.


My Milestag sniper rifle needs a trigger, so I CADed one up today. It uses a small, sealed microswitch from Farnell.

I'm very limited by the amount of height and width I have available in the wooden stock. This switch enabled me to create a switch module only 20mm high and 15mm wide:


Here are the internals after printing, you can see the cam operation on the leaf microswitch:


And with the top section in place, note the countersunk self tap screws to keep the with to 15mm:


After marking the dimensions on the underside of the stock, I routed and chiselled a recess for the trigger unit to fit in. Here it is in close up:


And complete with fitted front barrel clamps:

Monday, 12 August 2013

Milestag sniper rifle: Continued


Visit Tagbits to see the full range of tagger products described in this blog.

This weekend I used a round routing bit and my routing table to make a semicircular groove in the stock of the gun. The barrel will fit into this:


I need a clamp to hold the 20mm barrel in place. I CADed a clamp with an integrated picatinny sight rail:


This will clamp over the top of the barrel, and will be held in place with screws into the wooden stock. Due to 3D print size restrictions, I've had to split this into 4 sections.

After printing the rear section:


This has an enclosed end section to hide the end of the 20mm barrel:


Here it is with the rear pieces fitted:


It was looking so good I couldn't resist fitting the 'scope I got for it:

Thursday, 8 August 2013

Milestag sniper: Stock complete


Visit Tagbits to see the full range of tagger products described in this blog.

My neighbour brought the formed stock today and what a fantastic job he has made of it. It has been transformed from this:


To this:

Here it is alongside the original:

I'm awaiting a few parts to arrive from ebay, then I can start fitting.

Saturday, 3 August 2013

New Project: Milestag sniper rifle


Visit Tagbits to see the full range of tagger products described in this blog.

Ok, Missus is working nights. Two kids need entertaining during the day. Two solutions: XBox360 Lasertag
Here is my youngest in the garden tree taking at 20m shot:

The great thing about having loads of lasertag gear is that it reduces the cost of 8yo+ birthday parties to DIY. However, My oldest wants to be a sniper this year. So not to disappoint I've decided to make a one off.
This will be a wooden body based upon my old BSA Meteor air rifle:

0.22 calibre. A bit worn now after 34 years but I traced its outline and did a cut out:

The stock wood I was using was not wide enough to incorporate the butt. So I drilled a few holes so I could dowel in another piece:

I then used these dowel centres to allow me to drill holes to match those I'd drilled in the main part:

I then added the remaining butt section by gluing with 8mm dowels and clamping:

I traced the remaining butt of my air rifle onto this additional section:

And used a jigsaw to cut out:

I've ordered a LS2020 IR laser diode to give a several hundred metre range to this. My neighbour has access to a bobbin sander and will give it a working over next week. To be continued....