Monday, 27 August 2012
More domination tube
Visit Tagbits to see the full range of tagger products described in this blog.
I described my design for a Milestag Domination Tube here. I finally built it up and tried it out today:
It works well. I also continued with the domination tube box. I had already cut a hole for the tube in the lid of the box, today I installed a clamp at the base of the box to keep the tube upright:
Note the metal plate at the top of the inside of the box. This has a mechanism that allows it to tilt. I think it must be to allow the mortar rounds to roll out the box when the box is placed on that side.
With the clamp in the bottom and the tube cut to size it is progressing well.
Sunday, 26 August 2012
Domination Tube Continued
Visit Tagbits to see the full range of tagger products described in this blog.
To continue with my version of the Milestag Domination Tube I bought a genuine ammo box off EBay:
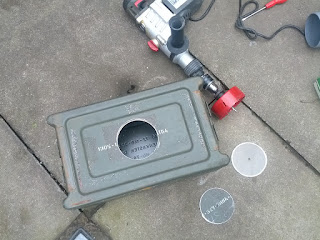
I needed to cut a 110mm hole in the top for the 'tube'. The nearest holesaw I could find was 108mm. To drill a hole of this size needs serious torque. I used my largest, and cheapest drill:
I still managed to stall this drill. It was interesting to note that the lid had dual layers. If I wanted to keep a dozen high explosive mortar shells safe, I'd use a double lid too:
Here is the box with the tube fitted. I used a pneumatic die grinder to shave off the last 1mm of radius. I need to trim it of course:
Saturday, 11 August 2012
Noisy
I was at the Uppermill Yanks Weekend today and these guys were running a 37L V12 Rolls-Royce Griffon engine. Fantastic! Nophead was complaining to me that he had write a health and safety risk assessment for last weeks MOSI Maker Faire. Goodness knows what the one that these guys produced looked like:
'danger of being dragged into large contra-rotating propellers powered by 1.5MW engine'
Saturday, 4 August 2012
First Aid
Visit Tagbits to see the full range of tagger products described in this blog.
I've just completed my version of the Milestag 'Respawn Box'. I designed my own PCB with KiCad and had some manufactured. My design is the same circuit as Jim's, but uses a few surface mount components.
I got a box off ebay and fitted the switches and LEDs. I designed PCB and battery mounts using CoCreate and printed them in white ABS:
The PCB is held in place with two channels that rise from the battery holder. It is prevented from moving by a clamp attached to the top of the box. I realised that I could dispense with the clamp if I added a catch to the top of the risers. I will implement this in the next version.
I designed a 'health pack' style cross and printed in in red PLA from Faberdashery. This is simply glued in place on top of the box:
Old and New
I have a rather old hexagonal table that was left to me by my Grandmother. It has no value, but it is nice to have in the house.
There is a hexagonal shelf that is meant to sit about half way underneath.
How this was anchored originally I have no idea, but some ancestor decided that their way would be with a set of 3, odd, screws. The shelf resting upon the head of each screw. This was far from ideal so I decided to fix it, the modern way.
I created some 'rests' in CoCreate. Each with a 60 degree angle and a small hole for a screw:
I printed them in white ABS:
They fitted nicely with some small brass screws I had lying around:
Job done.
Lathe Shim
My lathe is ancient. It is a Myford ML2. They started making these in the late 1930s so it has seen some action.
I recently bought a set of 12mm lathe tools from ebay. They cost me about £60 and seem to be of reasonable quality:
The problem that I have is that the lathe has an imperial centre height (the distance between the slide and the centre of the chuck). This means I have to place shims under the lathe tools to lift them to centre.
Inevitably I never have quite the correct shim available. Yesterday it occurred to me that a feeler gauge would probably have correct selection of heights. Problem solved:
Subscribe to:
Comments (Atom)


