Showing posts with label domination tube. Show all posts
Showing posts with label domination tube. Show all posts
Friday, 5 July 2013
Modified UMT as a Milestag Domination Tube
Visit Tagbits to see the full range of tagger products described in this blog.
Steve (Scorpy) at Ochil Explorers asked me if it was possible to create a Milestag Domination Tube that had displays to count red and blue team hits.
It occurred to me that this could be achieved by utilising one of my UMT boards, and writing custom software. And as the UMT board also has audio support, I suggested adding some sounds as well.
I did a special version of my UMT code to drive two 20mm white displays from Sparkfun, and designed and 3D printed a fascia to allow me to mount the displays, the UMT board and key switch. This had to fit into a 200mm x 80mm area as specified by Steve.
I modified the design of the IR sensor holder that I made for my domination tube so that it could be fitted into the tube Steve wanted to use,and used Audacity to record myself saying key phrases, then reduced the pitch and filtered with a phaser to make me sound less of a Lancashire lad.
Here is a video I did for Steve showing the unit:
Steve suggested I replace the team possession audio with a simple siren sound which would be more noticeable at the Gala type events he is planning to use it at.
And here is the finished unit after Steve boxed it up:
Saturday, 8 September 2012
Domination Tube Completed
Visit Tagbits to see the full range of tagger products described in this blog.
The domination tube is complete now after painting the tube and fitting a set of RGB LEDs that I had in the junk box. I've also added a keyswitch and a power indicator LED. It looks OK:
And of course because the tube is removal, it is slightly more storable:
Friday, 7 September 2012
More Dom Tube
Visit Tagbits to see the full range of tagger products described in this blog.
The Milestag domination tube requires that TSOP4856 sensor is mounted within the domination tube. I'm using standard 110mm drain pipe for my tube, so I designed this bracket to mount the sensor centrally when it is soldered to a small piece of Veroboard. It also has a hole to allow the cables to pass through and be tie-wrapped:
Here it is fastened inside the tube with a couple of self tapping screws:
Monday, 27 August 2012
More domination tube
Visit Tagbits to see the full range of tagger products described in this blog.
I described my design for a Milestag Domination Tube here. I finally built it up and tried it out today:
It works well. I also continued with the domination tube box. I had already cut a hole for the tube in the lid of the box, today I installed a clamp at the base of the box to keep the tube upright:
Note the metal plate at the top of the inside of the box. This has a mechanism that allows it to tilt. I think it must be to allow the mortar rounds to roll out the box when the box is placed on that side.
With the clamp in the bottom and the tube cut to size it is progressing well.
Sunday, 26 August 2012
Domination Tube Continued
Visit Tagbits to see the full range of tagger products described in this blog.
To continue with my version of the Milestag Domination Tube I bought a genuine ammo box off EBay:
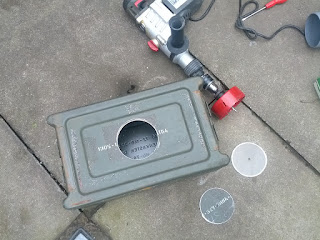
I needed to cut a 110mm hole in the top for the 'tube'. The nearest holesaw I could find was 108mm. To drill a hole of this size needs serious torque. I used my largest, and cheapest drill:
I still managed to stall this drill. It was interesting to note that the lid had dual layers. If I wanted to keep a dozen high explosive mortar shells safe, I'd use a double lid too:
Here is the box with the tube fitted. I used a pneumatic die grinder to shave off the last 1mm of radius. I need to trim it of course:
Wednesday, 18 July 2012
Domination Tube
Visit Tagbits to see the full range of tagger products described in this blog.
I've just finished designing a PCB for a Milestag Domination Tube.
My son has asked for a King of the Hill game and this is the only solution that I know of.
I've mixed SMD and through hole components for no reason other than I have the through hole parts in stock. It's a small board at just 40mm x 24mm. I probably could have made this PCB at home, but for the time it takes me, I've started getting all my PCBs done at ITead Studio. It is much less effort for me, and the finish is much better than I can achieve.
Subscribe to:
Posts (Atom)


