Tuesday, 30 December 2014

More 3D printed proton pack


I've been continuing with my build of a 100% 3D printed (actually about 97%, see next post) Ghostbuster's Proton Pack. The 'synch generator' has many thin rectangular details around its radius.

These can be seen in Steffan Otto's plans:


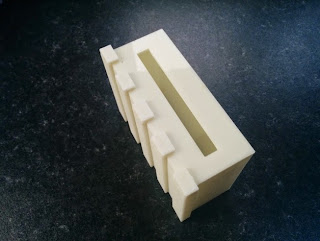
My plans is to glue these into place, but I need to adhere this lot:


Onto this:


In this style:


There are two problems here:
  1. The parts are thin and liable to fall over whilst the glue sets.
  2. The parts are angularly spaced at 16.36degrees.


I printed onto A2 paper the CAD drawing I had for the synch generator:


Then I aligned the synch generator onto the print:


I then hot glued the details into place, using the print as a reference.All in all...a successful job:


All design files are published here.

Sunday, 28 December 2014

Home Sweet Home


I've just fitted a Nest Learning Thermostat to my central heating boiler.
I discovered a few weeks ago that the thermostat on my wall is not actually connected to the boiler. This would explain why I was unable to regulate my house temperature by adjusting it, the boiler is controlling itself.No wonder my house is hot.

We have thermostat valves on all the radiators bar one, and I thought we could do better.
I got a good deal on the Nest thermostat. Nest Labs were bought by Google in 2014 for $3.2 billion, and so I'm expecting great support from this product. It is WiFi enabled and iOS and Android apps allow you to control it remotely. It also has self learning modes, and given a zip/postal code, knows the external weather conditions, so it can learn how quickly your house heats to ensure you have the desired room temperature at a given time. A web interface also allows for easy scheduling.

It comes with everything you need for a simple installation. The thermostat itself has a colour LCD display surrounded by a stainless steel rotary dial which is used to change settings. Pressing the dial like a mouse button confirms a selection. It is manufactured exceedingly well and oozes quality.

The thermostat is connected to the boiler controller wirelessly. The boiler controller is mains powered and provides a SPDT relay for control of the heating system. In normal operation the now defunct boiler timer is set to always on.
The boiler controller also outputs a 12V d.c. supply to power the thermostat. Normally one would simply disconnect the old thermostat, and use the old cabling to supply the Nest. I was unable to do this in my installation, but the Nest controller comes with a USB style wall wart which is fine.


The thermostat mounts into a cradle, which can be attached to the included wall plate, or an optional stand. Interestingly, the wall plate has an inbuilt spirit level. I've never seen a product with that level of detail before.

Unable to utilise the position of the old thermostat, I wanted to try a few different positions in the house in order to find the best location. Nest supply an optional stand, but it costs around 30GBP. When I find the ideal spot, I want to wall mount the unit, but I'm not willing to splash out so I designed and 3D printed my own.


It's very much based on the official stand which has inbuilt power connections, whereas mine simply allows the supplied USB power cable to fit in the back of the unit. I also added a flange at the back of the stand to prevent it falling over when operating the thermostat dial:


It's sitting in my dining room right now and seems to be doing what it is supposed to. The house certainly seems a bit cooler...which means I am spending less cash. I've published the stand files on Thingiverse.

Monday, 24 November 2014

Proton Pack build continued


Over the weekend I printed out the Proton Pack motherboard onto A1 paper. This allowed me to accurately position the holes. Each part of the PP has several mounting holes underneath, and I am using #4 x 19mm self tappers to fasten the individual parts. It's starting to look pretty good:


All the parts are uploaded to Thingiverse.

Sunday, 16 November 2014

Who ya gonna call...2


Well here it is, the worlds first, fully 3D printable Ghostbuster's proton pack. There are 3 parts missing that others have already created, so there seemed little point in duplication. It's missing the synch generator details, but these will be posted asap.

>

All the files are available on Thingiverse.

Sunday, 2 November 2014

Seeing things running through MY head.


In my quest to design a fully 3D printable Ghsotbusters' Proton Pack, I've had to make the part known as the 'Synch Generator'.

This is a large part, and it's the biggest thing I've ever made, weighing in at about 770g.


It's made of 6 paired copies, plus two other pairs, and is designed to be bolted together with M4 bolts. I printed it all in PLA to avoid ABS warping. Both my printers are in heated chambers, but even that struggles to prevent warping on such large parts.
All the proton pack parts can be downloaded here.

Friday, 24 October 2014

Who Ya Gonna Call?


My wife and I have been invited to a 50th birthday party in February, but it's fancy dress....Movie Style. And she wants to go as a Ghostbuster.

This does of course mean that I'm going to have to make us a proton pack each:


Now I could buy a kit, but these start at around £500.

So, it's time to fire up the 3D printer and the CAD system.
There are excellent plans available online at the GBFans website. But these are traditional 2D drawings, and not suitable for 3D printing.

There are some partial parts available on Thingiverse...

http://www.thingiverse.com/thing:302576 http://www.thingiverse.com/thing:95635

But none of these are either full kits, or have the 'difficult' parts missing. So I decided that I'd have a go at making a fully 3D printable kit. The first thing was to make a CAD model of the pack from the 2D drawings.


From this I made each part printable. For example, the Crank Generator is split into top and bottom sections as it is a wide, tall part that would be rather wasteful of plastic if printed in one piece:


This is one of the largest parts I have printed. It came out pretty good in white ABS in my heated print chamber:


Another interesting part is the 'spinner' on top of the crank generator. These are large potentiometer style knobs from the '70s with the part number MS91528-3S2G.


Almost totally unavailable in the UK. So from limited 2D drawings online, I modelled and printed it:


Another old part is this PH25 can style resistor:


And after printing:


This is still a work in progress, and there are several more parts before it will be complete. I'm putting all the parts onto thingiverse as I go along.

All the parts are available here.

Sunday, 12 October 2014

Retro Heaven


Visit Tagbits to see the full range of tagger products described in this blog.

Just got back from PlayExpo at Manchester's EventCity. This is an annual event for modern and retro gaming + Cosplay.

My son had been asked to go with a friend, and he suggested I come along too. Fantastic idea!

There were tables and tables of Sega Megadrives, Master systems, Atari 2600/800XL, C64, Intellivision, Vectrex etc etc. on free play.

My favourite was the retro arcade section. They had brought in loads of old arcade machines to play:

Defender, a personal favourite of mine:


My oldest checking out a classic:


And a modern silliness, virtual horse racing with Oculus Rift:


More retro goodness, Crystal Castles:


I had the chance to have a brief chat with Jeff Minter, I met him in the mid 80's when I was freelancing for Red Rat Software. I remember him as being a really nice guy then, and the years have not changed him. He took time to talk to me about the old 8 bit days of software development. Compulsory (unflattering) selfie:


And some not quite retro-retro:

Thursday, 2 October 2014

'er indoors....


Visit Tagbits to see the full range of tagger products described in this blog.

She really does have to tolerate me sometimes...and she does...mostly.....

Thursday, 11 September 2014

Ohm on the range


Visit Tagbits to see the full range of tagger products described in this blog.

I've been asked to make a large lasertag sensor harness for a client. This comprises of six Tagbits lasertag sensors on a single lead.


I was asked for four of these, three worked perfectly but the last one had a short between the power lines (+5V from a 7805).
A visual examination did not reveal the fault, and as I didn't fancy disassembling each sensor one by one I wheeled out my Polar Instruments Toneohm 700.

This is no spring chicken being last manufactured in 1988. But it's a great piece of kit having a 200mOhm (milli Ohm) range, and audio feedback with a higher tone indicating less resistance.

My normal multimeter in continuity mode indicated a short no matter where in the cable the probes were placed. But the Toneohm didn't even register a connection between +5V and 0V on any sensor until I tested the sensor that actually had the fault. e.g. It is so sensitive it registered open circuit along a 60cm piece of wire which was shorted at one end.
In fact, it's so sensitive it could detect which side of the PCB the fault was on:
Between the +5V and 0V connections on this side of the PCB, the resistance is 93.9mOhm.

But on the other side of the PCB, the same connections show 49mOhm, indicating the fault is on this side of the board.

And lifting the PCB showed a single strand of cable between 0V and 5V. Problem solved.

Monday, 25 August 2014

CNC....continued


Visit Tagbits to see the full range of tagger products described in this blog.

This week I've found time to make the control unit for my CNC router. It's standard Longs stepper controllers with a switch mode PSU and a parallel port break out board.

I 3D printed a mount for the connectors to the stepper motors and limit switches, and I've wired using bootlace ferrules to make it a bit neater.


The mains connection to the PSU was open, so I 3D printed a small cover for it on my Mendel90:

Friday, 8 August 2014

CNC Router..continued


Visit Tagbits to see the full range of tagger products described in this blog.


I've been really busy with LaserTag stuff..but recently I've had chance to resume my CNC router project.

This last week I plucked up enough courage to drill the £75.00 worth of aluminium I bought for the Y axis, it's 1500 x 550 x 15mm in size:


My simple Clarke pillar drill is woefully inadequate for this job.

Stage one was to spray mount a 1:1 2D print, (using my A0 printer), of the holes that I needed to drill in the ali plate:


Using an optical centre punch and the large bench at HacMan I centred all the holes. My colleague Ian at work drilled, counter bored and countersunk the holes impeccably using the Bridgeport vertical miller we have there:


Need to plumb in the motor next...

Sunday, 27 July 2014

Google Cardboard...impressions


The first time I heard about Google Cardboard was when the lens supplier I use for my LaserTag kits informed me they were out of stock due to demand.

With my interest aroused, I sent off for a kit from ebay: This turned up with some velcro fasteners, pre cut lens holes, glass lenses and instructions:


After half an hour with a scalpel and some super glue I ended up with this:


I found that the kit supplied triggered the power switch, and the volume switch when closed. I cut some holes to prevent this:


What's it like?.....amazing. Occulus Rift it is not...but for $30 it gives you an insight into the world of VR. I suggest you buy the cheapest copy of it that you can and try it. May I recommend: https://play.google.com/store/apps/details?id=com.divegames.divecitycoaster as a starter.

Manchester Mini Maker Faire


I visited the MOSI mini maker faire this weekend and took a few pictures. It's a really small event compared to others in the world. However, 'owt is better than nowt and it's great to see local makers turning out to support this event in its third year.Having 3 under 12s with me meant I had little chance to take all the pictures I wanted to. I got some though...

There was a soldering workshop in the main foyer. The task was to build a simple circuit which comprised of a battery, switch and a couple of colur cycling LEDs. My posse had a try..and did quite well considering it was their first time at soldering. Credits to the guys on the stand who had the patience of saints.....


An artist called "Dutch Cyclist" had mad life size Lego heads that the kids found enticing.....


The majority of the Makers were house in the 1830 Warehouse. This was the first railway warehouse in the world, and seems an appropriate place to encourage innovation:


Leeds Hackerspace had a cool water feature which incorporated a LED strobe. This slowed down the water stream to give a really cool display that my youngest found irresistible.


Leeds were also showing a large RGB LED cube that looked great:


York Hackerspace had a great space themed game that required players to co-operate with eath other to win:


Hacman, my local Hackerspace had a stand showing what the members have been up to: