Monday, 31 December 2012
Happy Holiday
I've been changing between PLA and ABS plastics over the Christmas holidays. Every time I flush the extruder from one plastic to another I seem to encounter blockages and general problems, which result at least in me having to dismantle the extruder.
Left to a single plastic, they seem fine. So I've decided to have multiple extruders, one for each plastic type.
So over the holidays, I made myself a new 0.4mm extruder hot end:
Friday, 28 December 2012
Mendel90 full kit build continued
See Nophead's post here for full kit details.
I continued with Mendel90 full kit build today. Due to my inability to follow English instructions I messed up the ribbon cable for the previous stage (might have been beer). So whilst awaiting for replacements to arrive, I progressed to the Z axis motors:
Sunday, 23 December 2012
Mendel 90 full kit stages 2 and 3
See Nophead's post here for full kit details.
With all the build up to Xmas I managed to sneak in enough time to complete stages 2 and 3 of the Mendel90 kit today with help from son Josh.
Stage 2 is quite trivial and involves bolting a fan to the side of the frame. The fan I had on hand needed some different bolts which I conveniently had lying around:
The X Idler assembly was quick to assemble and took about half an hour
Saturday, 22 December 2012
Mendel90 Full Kit Build Stage 1
Visit Tagbits to see the full range of tagger products described in this blog.
I've completed the first stage of my Mendel90 full kit build. Instructions so far are great, and once I'd taken the protective film off the Dibond sheets I could fully appreciate the quality of the CNC machined parts.
As mentioned in my last post, I agreed to take a some 'offcuts' from Nophead to get me going sooner, which is why the gantry is in silver Dibond, and the base and sides black. Normal kits will be the same colour!
One thing I really appreciated was that all the fastener vitamins were in labelled bags. This made it a lot quicker for me to find the right parts:
So here is stage 1 complete, total time, about an hour.
Tuesday, 18 December 2012
Mendel 90 full kit unboxing
Visit Tagbits to see the full range of tagger products described in this blog.
I ordered a Mendel90 kit from Nophead last week and finally got around to unboxing it.
Disclosure: I've known Nophead for 20 years and he agreed to let me have an early kit. The kit he supplied me had some parts in it that needed reaming, which I agreed to accept. Kits ordered here will be superior.
The kit has absolutely everything down to the last tie-wrap. Here are the printed and CNC machined Dibond parts:
There is so much in the kit I had to take two pics. Bear in mind that I already had the stepper motors and PSU/Mains lead which Chris agreed to leave out for me. Here are the rest of the parts:
Wednesday, 12 December 2012
Multitubinous
Visit Tagbits to see the full range of tagger products described in this blog.
I've been ask to design several custom IR focusing tubes for lasertag systems.
The first was for a short focal length, wide beam unit for use against vehicles. Laser-like focus is not good in this scenario as it would require a large target like a vehicle being covered in sensors.
I obtained 3 lenses in the 40-60mm focal length range and did some tests at visible wavelengths. This suggested that all 3 would suffice, but the customer agreed to take all three and decide for himself which was best.
I had to supply two focussing tubes as one of the lenses was 1.6mm greater diameter than the type I normally use:
I was also asked to design a picatinny rail mount for an IR focussing tube. This involved the design of some clamps to centre the tube on the rail. Here it is fitted somewhat impractically to the sight rail of an Airsoft gun:
And here in a more realistic position:
Friday, 7 December 2012
New Toy
Visit Tagbits to see the full range of tagger products described in this blog.
My old 'scope has finally been superseded. Bought this Tektronik 100MHz DSO from EBay whilst I was in Tallinn, Estonia last week.
I'm not a great fan of PC scopes as the software always seems a bit crap. So I went old school and bought this:
Saturday, 1 December 2012
Lasertag bodies
Visit Tagbits to see the full range of tagger products described in this blog.
I've been manufacturing many lasertag bodies for Steve at Operation Lasertag. These differ from my standard kits in that they are designed to fit Steve's analogue lasertag boards, and they have coloured plastic parts to allow for easy team identification, as well as raised gun sights:
Saturday, 10 November 2012
Luck + Failure
Visit Tagbits to see the full range of tagger products described in this blog.
I started a print for an order that Steve at Operation Lasertag has put in for some gun kits. I started a print off as usual, went into the kitchen to get a brew whilst listening to 'Today' on Radio 4. Radio 4 went off. Briefly I remembered something about Radio 4 being used to test whether London had been nuked. Coming to my senses I put 2 and 2 together and went to check the 3D printer. My 3D printer has a mains powered heated bed. I found this:
During the Z calibration the hot end had touched one of the bulldog clips used to fasten the print surface in place. Something had obviously shorted out the mains supply.
On dismantling the heated bed, I found that one of the 15W resistors used as a heater had gone OC, but had shorted internally to the case, raising the heated bed to 240V ac!!
I replaced the failed resistor and thankfully the hot end controller electronics that I use had survived intact, although the mains 5A fuse had blow. Lucky!
The first print I tried after repairs failed, but the extruder was playing up this time:
The fill had gaps. After checking the usual suspects, I focussed on the hot end. There had obviously been a leak as the grub screw used to fasten the nozzle in place had signs of something escaping:
Removing the brass hot end showed that the sealant I used on the threads between the brass and the peek had de-natured:
I managed to 'refurbish' the hot end. Cleaning the nozzle and re-installing with fresh sealant. There did not appear to be any internal damage to the peek/PTFE barrier. I'm waiting for the high temp sealant to set and will try again tomorrow.
Sunday, 21 October 2012
Halloween Again
As I print 14 gun kits for a customer I find myself with some spare time...and it's Halloween soon.
I've been using my pneumatically operated skeleton/coffin combo for a few years now:
This year I got a cheap posable skeleton and I've a few ideas to try out. Test number 1: Skeleton swinging on gallows in (motor assisted) breeze. The motor is from one of the 10p hoppers we use for payout at work. It has a high reduction ration and loads of torque.
Monday, 1 October 2012
Tri-Sensor
Visit Tagbits to see the full range of tagger products described in this blog.
I've just completed a special build of my Milestag sensor domes for a customer. This unit incorporates 3 sensor domes for cap mounting with the rear facing unit housing the distribution PCB and coiled cable connector:
As usual, mountings are RepRap and the acrylic domes home baked.
Saturday, 22 September 2012
Referee Gun
Visit Tagbits to see the full range of tagger products described in this blog.
I'm running a lasertag birthday party for my 10 year old son tomorrow. I realised that with 10 Milestag guns that key switches are insufficient to manage such an event. I had a few bits lying around so I created the most unusual referee gun I have seen to date. I had a handgrip/trigger and a focus tube to hand.I just added a LCD mount to a box I had:
Saturday, 8 September 2012
Domination Tube Completed
Visit Tagbits to see the full range of tagger products described in this blog.
The domination tube is complete now after painting the tube and fitting a set of RGB LEDs that I had in the junk box. I've also added a keyswitch and a power indicator LED. It looks OK:
And of course because the tube is removal, it is slightly more storable:
Friday, 7 September 2012
More Dom Tube
Visit Tagbits to see the full range of tagger products described in this blog.
The Milestag domination tube requires that TSOP4856 sensor is mounted within the domination tube. I'm using standard 110mm drain pipe for my tube, so I designed this bracket to mount the sensor centrally when it is soldered to a small piece of Veroboard. It also has a hole to allow the cables to pass through and be tie-wrapped:
Here it is fastened inside the tube with a couple of self tapping screws:
Monday, 27 August 2012
More domination tube
Visit Tagbits to see the full range of tagger products described in this blog.
I described my design for a Milestag Domination Tube here. I finally built it up and tried it out today:
It works well. I also continued with the domination tube box. I had already cut a hole for the tube in the lid of the box, today I installed a clamp at the base of the box to keep the tube upright:
Note the metal plate at the top of the inside of the box. This has a mechanism that allows it to tilt. I think it must be to allow the mortar rounds to roll out the box when the box is placed on that side.
With the clamp in the bottom and the tube cut to size it is progressing well.
Sunday, 26 August 2012
Domination Tube Continued
Visit Tagbits to see the full range of tagger products described in this blog.
To continue with my version of the Milestag Domination Tube I bought a genuine ammo box off EBay:
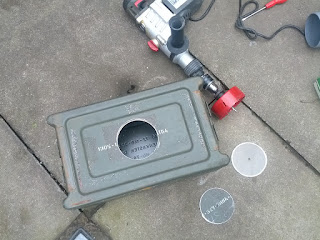
I needed to cut a 110mm hole in the top for the 'tube'. The nearest holesaw I could find was 108mm. To drill a hole of this size needs serious torque. I used my largest, and cheapest drill:
I still managed to stall this drill. It was interesting to note that the lid had dual layers. If I wanted to keep a dozen high explosive mortar shells safe, I'd use a double lid too:
Here is the box with the tube fitted. I used a pneumatic die grinder to shave off the last 1mm of radius. I need to trim it of course:
Saturday, 11 August 2012
Noisy
I was at the Uppermill Yanks Weekend today and these guys were running a 37L V12 Rolls-Royce Griffon engine. Fantastic! Nophead was complaining to me that he had write a health and safety risk assessment for last weeks MOSI Maker Faire. Goodness knows what the one that these guys produced looked like:
'danger of being dragged into large contra-rotating propellers powered by 1.5MW engine'
Saturday, 4 August 2012
First Aid
Visit Tagbits to see the full range of tagger products described in this blog.
I've just completed my version of the Milestag 'Respawn Box'. I designed my own PCB with KiCad and had some manufactured. My design is the same circuit as Jim's, but uses a few surface mount components.
I got a box off ebay and fitted the switches and LEDs. I designed PCB and battery mounts using CoCreate and printed them in white ABS:
The PCB is held in place with two channels that rise from the battery holder. It is prevented from moving by a clamp attached to the top of the box. I realised that I could dispense with the clamp if I added a catch to the top of the risers. I will implement this in the next version.
I designed a 'health pack' style cross and printed in in red PLA from Faberdashery. This is simply glued in place on top of the box:
Old and New
I have a rather old hexagonal table that was left to me by my Grandmother. It has no value, but it is nice to have in the house.
There is a hexagonal shelf that is meant to sit about half way underneath.
How this was anchored originally I have no idea, but some ancestor decided that their way would be with a set of 3, odd, screws. The shelf resting upon the head of each screw. This was far from ideal so I decided to fix it, the modern way.
I created some 'rests' in CoCreate. Each with a 60 degree angle and a small hole for a screw:
I printed them in white ABS:
They fitted nicely with some small brass screws I had lying around:
Job done.
Lathe Shim
My lathe is ancient. It is a Myford ML2. They started making these in the late 1930s so it has seen some action.
I recently bought a set of 12mm lathe tools from ebay. They cost me about £60 and seem to be of reasonable quality:
The problem that I have is that the lathe has an imperial centre height (the distance between the slide and the centre of the chuck). This means I have to place shims under the lathe tools to lift them to centre.
Inevitably I never have quite the correct shim available. Yesterday it occurred to me that a feeler gauge would probably have correct selection of heights. Problem solved:
Saturday, 28 July 2012
MOSI Mini Maker Faire
I went to the Mini Maker Faire at the Manchester Museum of Science and Industry today.
It was great. Not on the scale of US events (hence mini) but there was some interesting stuff:
A huge model railway. They wisely kept the model railway enthusiasts isolated from everyone else by keeping them in the power hall. No idea what gauge it was but it was bigger than OO:
The majority of the exhibits were in the 1830's warehouse:
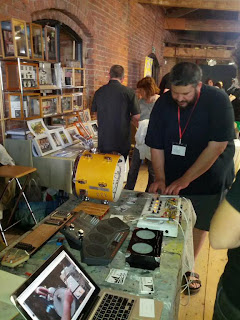
This guy had a Atmega based audio synthesiser. Just plug in a MIDI keyboard and go. The analogue filters could be patched with leads Korg style:
This stand had a pair of metal chimes that were played by a solenoid powered hammer. The hammerwas moved to the appropriate note by a stepper motor:
This lady inspired my son with a collection of model spaceships made from bottles and other bits. We bought her book:
More wacky audio:
This 13 year old kid had made all the models here:
Nophead and Mary + Wes at the mendel90 stand:
Lifesize Operation!:
Crazy golf with Minecraft inspired finale:
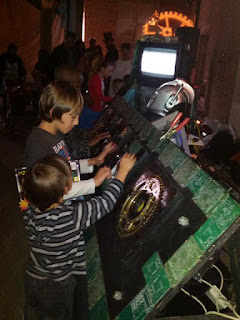
Audio generation and art mixed. This set up seemed to be designed to make as much noise as possible with as much redundant (i.e. glued together with no power applied) circuitry as possible. The kids loved it:
It was a great, free day out. MOSI is a great place to take the kids at any time. But we really enjoyed the Faire. Can't wait for the next one.
Subscribe to:
Comments (Atom)


